
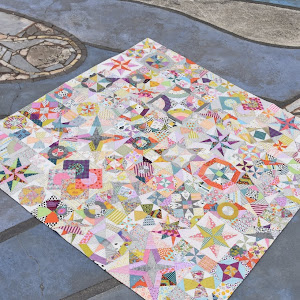
Month two and we have two blocks. One with curves (well this is the circle game!) and the other with Y-seams. Bring it on!
Staying with the new woven’s from Jen I played with the fabrics for these blocks on my design wall. The difference in playing on a white design board or the intended background really impacted the contrast and saturation.
Try it and see.
I have some of Kaffe Fassett’s grey design board flannel fabric but I tend to take that to workshops. Maybe it's time to get it on the wall too.
I don’t know about you but I wonder if I overthink this stage but the old adage ‘measure twice, cut once’ is in my head, may be the quilting equivalent is ‘audition twice, cut once’ (feel free to substitute twice for any number), here is the final choice for this month’s blocks:


The woven’s are a great mix of self-patterns, check, stripes, ‘hounds tooth’ and plains that have a different warp and weft to give depth, there are some with the same pattern in different neutrals.
For the 8-Pointed Star I chose two with the same stripe, and set a challenge of matching the stripes and for the second block this month I went with a ‘square’ theme.
This is how the block turned out…


Yes, the astute will spot that some non-neutrals have crept into the second block. Ever since I started playing with the quilt I thought that I wanted to add a drop of colour here and there but keep it muted as well as in a very limited range of maybe three or four shades. I went from greens to ochres to reds but ended up with teal. Not every block will have it, but it will feature in the block frames I think. I’m hoping it will make the eye move around the quilt. We’ll see.
These are also wovens – they are the shot cottons from A Day in the Country.
In the second block not all the ones I finally settled on made the block (they made the cut but not the block – or they got cut again but at a different angle, so in the scrap bag they go for later).
The self-pattern squares in the points did not work when they fell in line with the other checks so I cut the pieces so the squares were on point, changing the cut direction also made the bias curve easier to sew.
I was happy!
When I was taking the photographs, I played with the layout and was interested in how a 90-degree rotation can just seem to change the block…

That’s something I love about quilting, the tricks your eyes play on the brain. And how a simple turn alters perspective. There’s a lesson for life!
So, ‘Y-seams’. I was asked on a couple of Instagram posts about how I do Y-seams. As I was teaching myself Y-seams and reading books, YouTube and blogs I fell into what is probably a combination of all of the ways I saw being demonstrated. I actually love Y-seams and hand piecing makes then so much easier as the control you have seems much better compared to machine piecing. I do them on the machine, but much prefer hand piecing.
A little explanation follows on how I do my Y-seams!
Apologies to those of you who can do these in your sleep. This is just my distilled approach to Y-seams
I have found that a little care in marking up the fabric (as well as careful cutting) makes a huge difference to the end result. Go figure!

Then using a ruler to mark up the pieces, or the template.
I use a ruler that is etched rather than printed as I find the sandpaper board rubs away the markings and I don’t like to scratch my templates!

Yes that’s a Sue Daly rotating cutting mat with a little hack – more of that with next month’s block.
I have learnt that sewing with the piece being inserted into the Y-seam at the back makes a better seam. After pinning the fabric, ensuring you join the dots on both pieces, sew away.

I stop a stitch or so away from the seam. I then take the seam over to my left to form a ridge and insert the needle through the fabric until I feel it pop off the ridge and then bring it through to the front. This way the last stitch is right up against the seam. Then a do a couple of very small back stitches being careful to not go beyond the point.
 |
| Look at those stitches! |
The next stage requires you to pivot the piece being inserted, pin the end and get the fabric flat. I then lift the seam up and put my left thumbnail right up against the seam and put the needle through the seam up the nail and then make another little stitch to fix the point and then stitch to the end.


In short, after the marking-up it’s ‘pin, sew, pivot, sew, repeat’. Then ‘press’. Never underestimate the power of steam in a Y-seam.

I have read discussions in hand piecing of which shapes or blocks you can stitch to the edge of the fabric and which ones to take to the dot. I only go to the dot, that way I don’t have to think. My rationale is that when you then press the piece the seams can fall and can be manipulated how you want though I often find the seams show you how they want to fall. I sometimes get just a little frustrated when pressing machine-pieced blocks as the joins can be difficult to manipulate. You can see this in the back of the Star block from this month.

Enjoy those Y-seams (and curves!)
***********
Huge THANK YOU to Gary for this post.
We appreciate the effort you have gone to.
You can see more of Gary's work over on his Instagram page: @live.breathe.create
xoxo
Happy Stitching


No comments:
Post a Comment