
Hello friends,
Half way into this quilt and with every stitch I fall more and more in love.
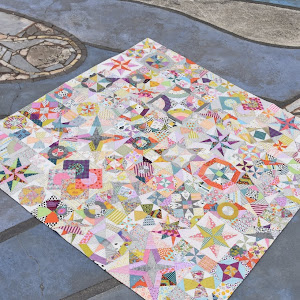
With each block completed, I drag all my blocks out again and lay them out. I posted this image recently on Instagram (@lucycarsonkingwell) of my 'Design Floor' to gauge where it's all heading and it's looking okay!!

Delilah has been a test - I have learnt many new skills and it is definitely the most technical quilt I have taken on to date... but it's not hard!
The templates are fantastic. I swear working with acrylic templates makes it quite challenging to go back to temp-plastic! These templates are ensuring my blocks come out correct, every time.
Month 5 brought us North Star. "Woo hoo. Straight lines!" I hear the masses cheer as they open their mail!
I knew it was time to start focusing on other colours other than pink and aqua. I tend to gravitate towards these two colours because they seem to go with everything to me... especially in the Liberty of London fabric selections!
I knew it was time to start focusing on other colours other than pink and aqua. I tend to gravitate towards these two colours because they seem to go with everything to me... especially in the Liberty of London fabric selections!


But North Star gave me plenty of options to play around with. When making 5 of the one block, each time is an opportunity to play with placement of light and dark.
I used blocks with more controlled colour palettes here. My backgrounds were getting very busy, so with North Star I kept my background as one fabric per block. It really helps define the block pattern.
I used blocks with more controlled colour palettes here. My backgrounds were getting very busy, so with North Star I kept my background as one fabric per block. It really helps define the block pattern.


This last image was the first made and is my least favourite. I really dislike this block as a standalone, but I won't address this until the end as I think he will work... plus, I don't believe you have to LOVE every block for the quilt to be successful.

Month 6 is the block 'In Orbit'. I love, love, love this block!
It's fiddly at times but with careful cutting and following the instructions (yes... I know. Novel idea!) this block comes together without a hitch.
This block is a great place to showcase some larger scale prints, which was a focus of mine. I am hoping that these blocks, although still busy, they will give the eye a place to rest as they have a bit more of a uniform approach, like in the North Star blocks.
This block is a great place to showcase some larger scale prints, which was a focus of mine. I am hoping that these blocks, although still busy, they will give the eye a place to rest as they have a bit more of a uniform approach, like in the North Star blocks.


As I move through my Liberty selection for this quilt, I am starting to run out of my old faithfuls. This has never bothered me. In fact, this is when I start to have the most fun! I am not bothered if I run a little short - isn't that what patchwork is all about? Run out and make do?
Maybe it's just me but this is the charm of vintage quilts (if I had a dollar for every time I have said this!).
You can see in the block above and the block below - I ran a little short in places (the pink fabric above has 1 replacement piece and the background below has 3 replacement pieces).
I like to include this in all of my quilts but I try to let it come organically. I legit ran out of those fabrics because I thought I had enough of each for my plans... close, but no cigar!

The block below really illustrates how when a background is scrappy in this quilt, you can quickly lose the form of the block.
I still love this look. I love print on print, on print! But you do need breaks at times.
I guess I felt the break was over and after so much control in my approach to these two months, I threw caution to the wind!
I guess I felt the break was over and after so much control in my approach to these two months, I threw caution to the wind!

This blog post isn't all block pictures.
It has come to my attention that acrylic templates aren't friends with everybody so I thought I would do a little tutorial on how to use your templates successfully regarding In Orbit.
This block has reverse templates, directional markings and Y seams so I can understand why some people's heads are spinning!
This is my approach. It is slightly different to Jen's pattern.
I will include as many hints and tips as I can think of along the way but to be honest, there's nothing complicated here. In fact - how I approach these blocks is all about eliminating possible complications!
ACRLIC TEMPLATES:
CUTTING TUTORIAL.
In Orbit - Month 6 - Delilah
Explained in Month 1 with all your tips and tricks from Jen, it notes that it's a lot clearer if you work with the wrong side of the fabric facing you! So, pretty much, lay out your blocks with the wrong side of the fabric facing up.
Why?
In hand piecing, you draw on the back of the fabric. Jen is a hand piecer and her pattern's diagrams are displayed in the same manner.
This block, like many, in this quilt can be broken into quarters (pretty much).
I think it's easier to break these blocks down into those quarters and work in more controlled groups.

Above to the left is the whole block diagram, and to the right is what I mean by a quarter. You have the centre unit and a quarter coming off it.
This means instead of cutting all the block at once, creating lots of pieces to keep track of (29 all together in this bad boy), you're working with a smaller group. Eliminating a lot of chances to put the wrong piece in the wrong place!
I find this helpful, especially with this block, as we have that little directional mark (*) to watch out for.

Now, do not be fooled by Mr. T22 with his * in this block... looks can be deceiving and although he may look like a equilateral triangle, he is not! You can see this in the below image, when you lay T22 and T22R over each other...

This is why we need to cut 1 x T22 in it's normal position (right side up), and 1 x T22 reversed (remember we are referring to quarters in this little tutorial!)
MARK YOUR *
Using a pencil (I love the Sewline pacer!) mark the corner where the * is.
Simple, quick and easy! Plus, it'll save you from cursing when you have to unpick where you've sewn it in incorrectly, because you DIDN'T MARK IT!
Same goes for T23 - one edge is more angled than the other. This sharper angel must always point to the outer corner of the block... it actually makes the corner!
So it's very important that you cut 1 x T23 and 1 x T23R.

NOW MARK THE REVERSE TEMPLATES TOO!
Using your pencil, write a little R in the seam allowance somewhere!
Now that you have cut out these pieces, marked your * and R where necessary... stitch your quarter together following the pattern.
Note that the * always faces towards the outer centre of each quarter and will match up with the point of T25 in the centre unit.

At this stage, Jen adds T24 and T24R but I actually added these on last as the final step, once the quarters have been attached to the centre unit. I found it helped make it a lot less fiddly.
Once water is stitched to the centre unit, I then make my next quarter.
Once all quarters are attached, then I add T24 and T24R to the block.
These bits are easier to see where they go as they square off the block!
Once all quarters are attached, then I add T24 and T24R to the block.
These bits are easier to see where they go as they square off the block!
So, that's that.
As mentioned, this isn't rocket science.
I have just broken my block down into more manageable groups, and marked the pieces I need to keep track of. This helps eliminate the risk of stitching the wrong piece in the wrong place.
I cannot wait for Month 7 to arrive so in the mean time I am focusing on filler blocks.
The instructions for these come in Month 12 but I am taking a slightly different approach so we can talk about that next Delilah blog post.
Hooray!

Thank you for reading!
I hope this has been helpful for some and I would be interested to know if there is anything else I could include over the next posts that might be helpful.
xoxo
Happy stitching!
Lucy
P.s. Don't you love takin photos outside!

www.amitie.com.au
Find us on Instagram @amitietexiltes | @jenkingwell | #amitietextiles
www.facebook.com/amitie.textiles


4 comments:
Thanks for sharing your photo's and tips Lucy!
Thanks so much for this tutorial. I am waiting to pick up my BOM, so have not yet tackled this block. I really enjoyed the pictures of your blocks. Wonderful fabrics! Happy Stitching, Lona
Really useful, thank you. Do you stitch the seams down in any direction when you come to junctions or move them to either side until later? i I found I had stitched seams in Fairhaven block and it got a bit bulky so was wondering what's easiest.
Lovely to see your blocks Lucy. Love all that Liberty fabric!
Post a Comment